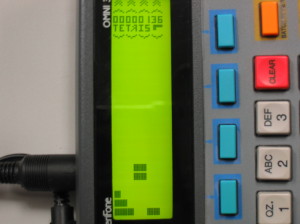
At VCF MidWest this fall, I demonstrated how I had reverse engineered a credit card terminal and reprogrammed it to run CP/M. While there, there were several discussions of what to do next. During these conversations, I realized that by turning the terminal sideways, I could use it as a display for Tetris.
I started initially by adjusting Micro Tetris to run under CP/M. This was a fairly simple port using SDCC, with the substitution of a delay counter for the normal interrupt driven method of triggering the piece drop.
The next step was to add control using the terminal’s keypad. I assigned 5 and 0 as left and right, 8 as rotate, and 7 as drop. This felt comfortable, and was easy to use. I also assigned the # button as a quit option.
Once I was able to control the pieces with the keypad, I adjusted the display to match that of the terminal. With only 4 characters wide, and 25 characters tall, I would need to do something to display the pieces. Unfortunately, the terminal uses a HD44780 compatible display, which is character based with only 8 custom characters available. Each character is 5 by 8 pixels, which makes it logical to define a single block element as 5×4. This means that I can have 8 columns.
The terminal actually uses two display chips, one for the left 20 columns (when in normal position.) The second chip is used for the remaining 5 columns. To keep things easy, I decided to use only the left half for the Tetris playing field. This would allow me to use the 8 custom characters in the right half, and provide for 20 rows.
After programming the necessary custom characters (a blank, left only, right only, and all pixels,) I mapped the internal play field to the display itself.
At this point, I had a very playable version of Tetris, but I felt I had more features of the terminal to use. What is Tetris without sound?
As noted on the BMOW site, the speakers in these terminals are tied to a single flip-flop, which restricts their ability to produce complex sounds. By programming a timer with the frequency desired, simple notes can be produced. I programmed a second timer to generate a periodic interrupt, and had it change the frequency as needed.
An array with the frequency and times produced the tune Korobeiniki. One clever trick I used was to recognize that the frequency values required different dividers, but that I did not need all 8 bits for the counter. I could use the top bit to determine the correct divider for the primary clock frequency.
The last item on my list was to use the top 5 lines to display the score, a small logo, and the next piece. I could use the 8 custom characters to create these items. I loaded the display with the custom character values, and then reprogram the character generator RAM with the correct values to create the characters on the screen. The score is stored in BCD notation to make selecting the values simple. The pieces are stored in a second font table and then loaded into two custom characters to provide for a preview.
You can see all of it put together below: